
There are essentially two ways in which you can bring content within PowerPoint — either by using options within the Insert tab of the Ribbon or by copying content from other programs and pasting within PowerPoint. In this post, we will explore the latter way, and also look at why you should explore the Paste Special option rather than using the plain vanilla Paste button that slide-creators typically use.
Before we proceed further, you must also use some PowerPoint shortcuts to make this copy and paste process easier. Here are some well-known and also some lesser-explored keyboard shortcuts. Mac equivalents are in parentheses:
Ctrl + C (Command + C): Copy
Ctrl + V (Command + V): Paste
Ctrl + D (Command + D): Duplicate
Ctrl + Shift + C (Command + Shift + C): Copy attributes
Ctrl + Shift + V (Command + Shift + V): Paste Attributes
Ctrl + Alt + V (Command + Ctrl + V): Paste Special
To find more keyboard shortcuts, explore our PowerPoint Keyboard Shortcuts page.
We have provided more keyboard shortcuts than what we will explore in this post. However, they are all related and you can play around with all the shortcuts. In future posts, we will look in more detail at shortcuts for Duplicate, and Copy and Paste Attributes options.
Paste vs. Paste Special
Let us first explore how the Paste Special option is different than the conventional Paste option. When you use Paste, PowerPoint makes a guess about what would be the best format to paste your content within PowerPoint. For example, if you copy some content from Excel, should PowerPoint paste the content like an Excel embed or link, a table, or just plain text? In some cases, it may paste the content as an Excel embed or a table. Paste Special lets you decide what you want to do with the content.
Let’s continue working with our example of copying Excel content to the clipboard with this workflow:
- Launch both PowerPoint and Excel, and make sure the files you want to work with are open within both programs, as shown in Figure 1, below. Make sure to save the open files if you have made any changes. The keyboard shortcut, Ctrl + S (or Command + S, if you are using a Mac) should save your content quickly.
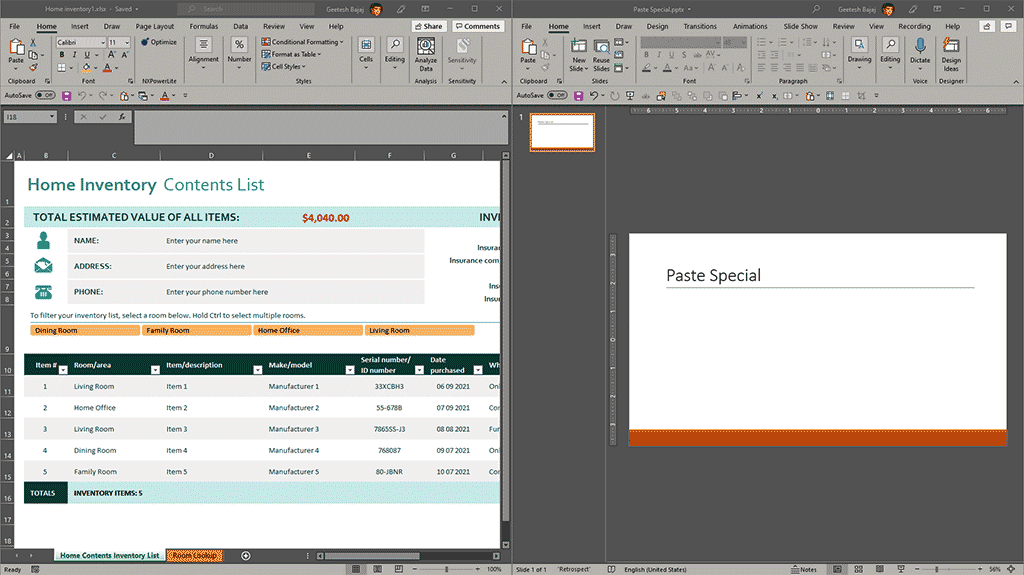
Figure 1: Excel and PowerPoint open at the same time- Next, select some cells within Excel, as shown in Figure 2, below. Now, press the Copy button in the Home tab of the Ribbon. Alternatively, press the Ctrl + C keyboard shortcut. Mac users can press the similar Command + C keyboard shortcut.

Figure 2: Select some cells within Excel- Switch to PowerPoint, and navigate to the slide where you want to paste your content. Access the Home tab of the Ribbon, and press the Down Arrow area within the Paste button, as shown highlighted in red in Figure 3, below. Doing so brings up a drop-down menu. Click the Paste Special button in this drop-down menu, as shown highlighted in blue within Figure 3. You can also use the Ctrl + Alt + V keyboard shortcut to achieve the same result. Mac users can use the similar Command + Ctrl + V key.
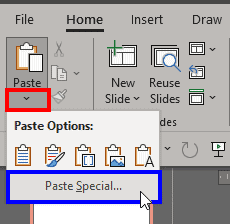
Figure 3: Press the Paste Special option- Either way, you will bring up the Paste Special dialog box, as shown in Figure 4, below.
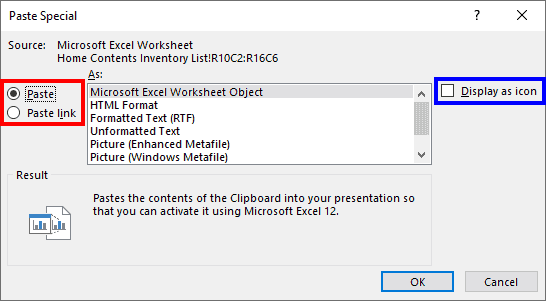
Figure 4: Paste Special dialog box in PowerPoint- Look carefully at the six visible options in the middle of Figure 4, above. Additionally, there are two more options that are not visible because you need to scroll down to see them. These eight options are:
-
- Microsoft Excel Worksheet Object,
- HTML Format,
- Formatted Text (RTF),
- Unformatted Text,
- Picture (Enhanced Metafile),
- Picture (Windows Metafile),
- Device Independent Bitmap, and
- Bitmap
- Typically, the first option is what you would have pasted the content as, if you have chosen the Paste option rather than Paste Special. Clearly, there is so much more being offered in Paste Special, and options offered will differ depending upon what you have copied. In some cases, the source can be another program, such as Excel, but there’s no reason why you should not explore the Paste Special dialog box when pasting from PowerPoint to PowerPoint as well!
-
Differences in Pasting from PowerPoint and from Another Program
There is one big difference when you access the Paste Special dialog box when the copied content is from PowerPoint rather than from another program, and this is true even if you are copying from another PowerPoint file.
You’ll find that the Paste Link option, which can be seen highlighted in red in Figure 4 is now grayed out, as shown in Figure 5, below.
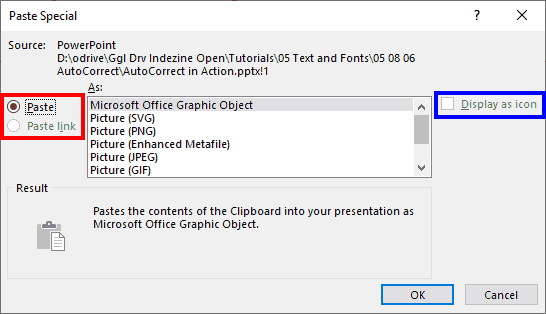
Figure 5: Paste Link and Display as Icon options are grayed outIn addition, you will find that the Display as Icon option, which is highlighted in blue in Figure 4, shown previously on this page is also grayed out in Figure 5, above because the content being pasted was being copied from PowerPoint rather than another program.
So what do these two options do? Let’s find out:
Paste Link
The Paste Link option, when selected, retains a link to the original source document, and when you make a change to the area copied in the source, it is updated within the content pasted within PowerPoint. This option works best if you save both the source and destination files in the same folders, even before you do the Copy and the Paste Special processes.
Display as Icon
The Display as Icon option, when selected doesn’t show the copied content, but places an icon representing the content, as shown in Figure 6, below. To view the actual content, you will have to double-click the icon in Normal (Editing) view and not in Slide Show view.

Figure 5: Icon representing the contentThere is a workaround to make it work in Slide Show view as well, but we will explore it some other time.
So, what did we learn from this tutorial? We found that there are far more options available within the Paste Special dialog box than what you end up with when you choose Paste. So, do explore these options, and choose what works best for you.


