
Some people use PowerPoint for advertisements and information screens. Typically for those type of presentations, you need to create astonishing presentations with great visuals. For them, showing high-resolution quality images in PowerPoint are crucial! But, when you put your images into PowerPoint, do your images remain high resolution? Or does PowerPoint compress images?
More details on images, formats and sizes
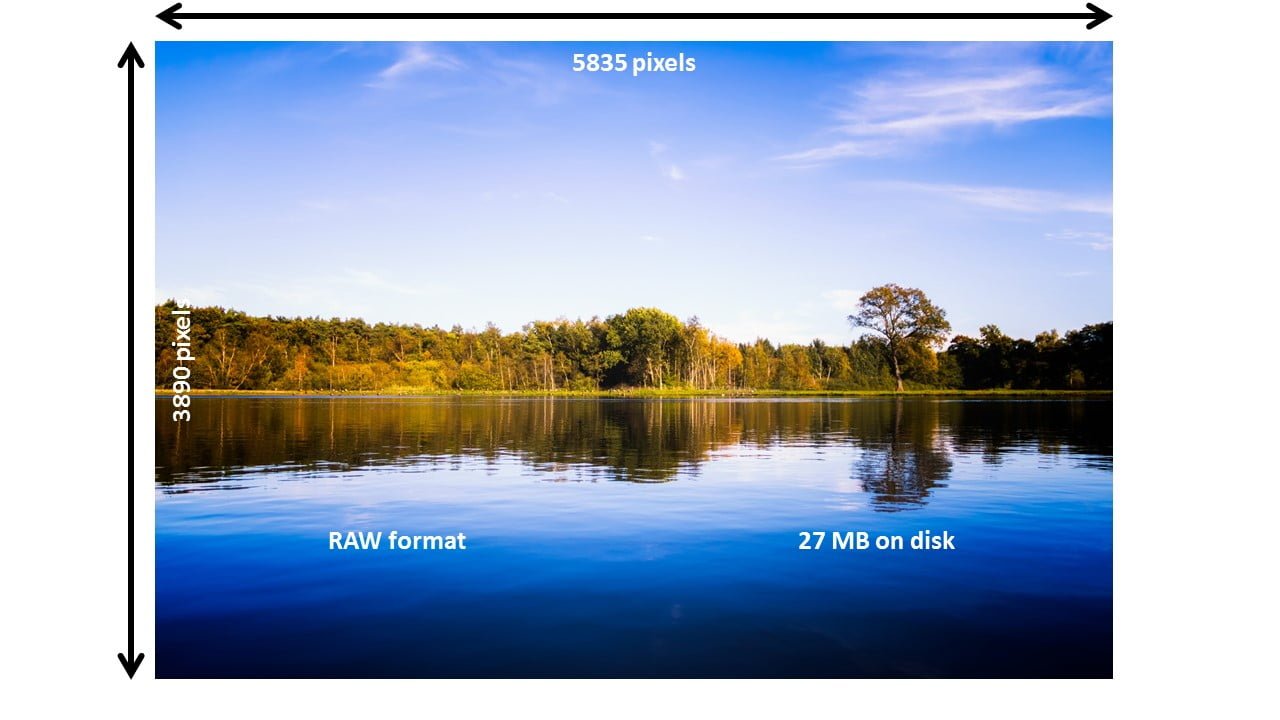
Let’s share some expert knowledge on PowerPoint and images. A given RAW photo, taken by a SLR camera, might have a dimension of 5835 by 3890 pixels, and its file size is 27 MB. Because the image is not compressed, it contains the maximum amount of information. Each pixel of the RAW photo, contains the most information possible. But you cannot use RAW images in a PowerPoint directly. You need to convert the image to, for example, a compressed JPG image.
The compressed JPG equivalent of this same image still contains a dimension of 5835 by 3890 pixels, but the file size is 4.1 MB now. Almost 7 times smaller than the original RAW photo. We can use this JPG image directly in PowerPoint here. By compressing the image, we are taking out that massive amount of information by using compression techniques. My photo has a resolution of 5835 by 3890 pixels, so in total almost 24 millions pixels. Each pixel holds color information. There is obviously repetitive information in a RAW image. When you have e.g. a black wall, then each pixel of that wall, has the same color. In stead of storing 1000 times the black color information, pixel by pixel, the compressed equivalent will store a repetition of 1000 times a black pixel. That saves storage capacity. So, instead of writing black pixel, black pixel, black pixel, … 1000 times, the compressed format will write: 1000 x black pixel. That is compression.

File size observations: Image as slide background
When you would use that compressed image of 4.1 MB as a slide background image (Format Background, Picture or texture Fill), and then save the presentation, you would see that the presentation’s file size is 4.1 MB. To be exact: the image is 4.08 MB and when the presentation measures 4.11 MB. You can conclude that the presentation’s size is 0.03 MB and the image is kept 1 on 1 in the presentation. So in other words; the image, when used as a slide background, is not altered nor compressed in PowerPoint.
Interesting to know that when you duplicate the slide or even use a new slide and set that same image again as slide background, it will not increase the presentation’s file size. So in other words; PowerPoint is intelligent enough to see duplicates of the same background image. And if you would have 100 slides with the same background image, it optimises the file size by counting in the image only one time.
File size observations: Image directly on slide
We will continue to use the same JPG image but, we will not use it as a slide background. As an image shape or picture shape on a slide. Click Insert, Pictures and browse to the same image. Draw the image shape to completely fill the slide the same as the picture in the slide background. Save the presentation and inspect its file size. Surprisingly the file size is only 128 KB!
How is that possible? Same image, same display dimensions, but the file size drops from 4.1 MB to 0.13 MB or 128 KB.
Note that we inserted the same image almost slide-filling on our test slide. Let’s try something else. Insert again that same image on the slide but, now resize the picture shape to a small shape filling maybe 1/8 of the slide. Save again. See, the file size is now around 35 KB.
So, in both cases PowerPoint compresses the images significantly.
Is this bad?
This confirms our impression that default options make PowerPoint compress images. PowerPoint is compressing pixels, or removing information from the inserted image. When you end up in the situation that a previously shrunken and saved image, needs to be slide filling again, then you get a problem! The surplus of pixel information before the save action, is now not available anymore in the presentation. When you would use the shrunken image at full now, you will see enlarged pixels, because the enlargement is exploding the existing pixels.
Is that a bad thing? Not necessarily! It all depends on how we are using PowerPoint; how do we present our presentation, and do we need to transport the presentation, maybe via mail.
In case you want to use PowerPoint to create presentations that you might have to send to others via mail, then the compressing of images is a good thing to keep the total file size low.
But, when you are using PowerPoint for your high-quality information screens, or when you create advertising presentations in PowerPoint, then it is important that you use the best quality and that you use uncompressed images.
Also read this article about the best resolution in PowerPoint. Note that the default 11.33″ by 7.5″ is not sufficient for HD presentation output on most of the large monitors on the market.
Methods To Block PowerPoint Compress Images
There is an important setting in PowerPoint that sets the level of compression. In PowerPoint, click File, Options, Advanced.
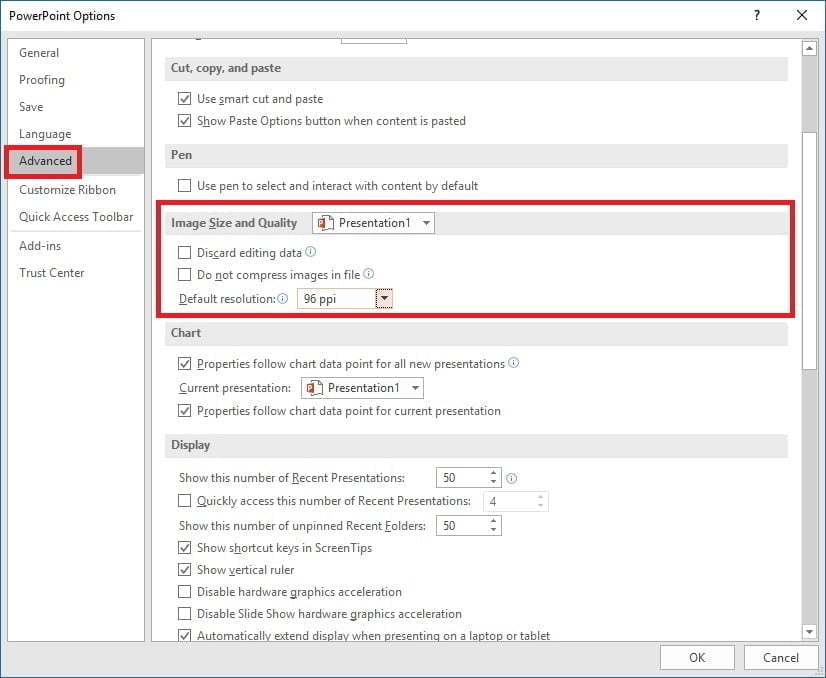
See the option to set the default resolution. This setting is set to the lowest value by default. It determines how many picture pixels you will have per inch (ppi or pixels per inch), when you would print this image. An inch is 2.54 centimetre and a pixel is a dot that has a given color. The more pixels or dots you have on an inch, the more quality or sharper image that you have on your print or screen.
For professional quality, people always use 300 pixels per inch. If you need this quality, set the default resolution to 330 ppi or high fidelity. And remember that for on screen presentations, you cannot display more pixels on your slides and images, then the resolution of your screen is low. An image with more pixels than that, is wasted when it is displayed on your screen.
Another valuable option to keep high-quality images in your presentation, is to check the option Do not compress images in file.
Use these above methods to block PowerPoint compress images.


Good explanation, anybody can understand and apply this easily.
Thanks Willem!
Yes. I applied and get the colourful theme for my presentation