
What is a Digital Menu Board?
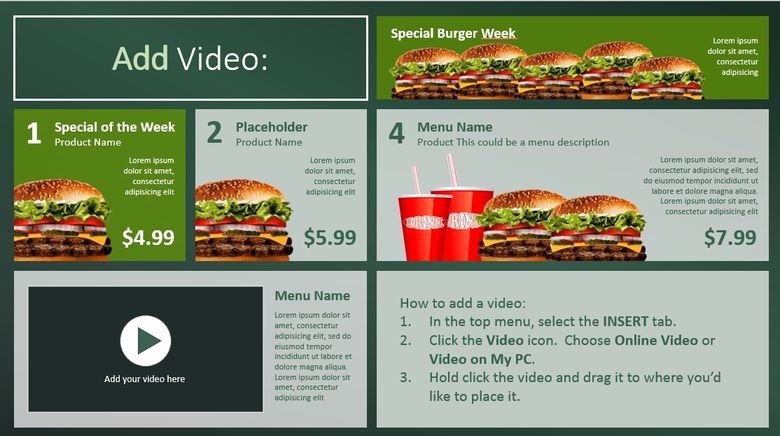
Digital menu boards are menus displayed on computer monitors or TV screens. These are commonly used in coffee shops and restaurants. They include pictures and prices of menu items. It is easy to update and can be connected to databases to automatically update across all the locations within a few minutes. In this article, we will show the exact steps that is used to create a menu board like the one below, how to add pictures, pricing and videos and how to connect to a central database.
For more information on the advantages of digital menus, click here.
Create a New Slide show
- Open PowerPoint and start with a new blank presentation.
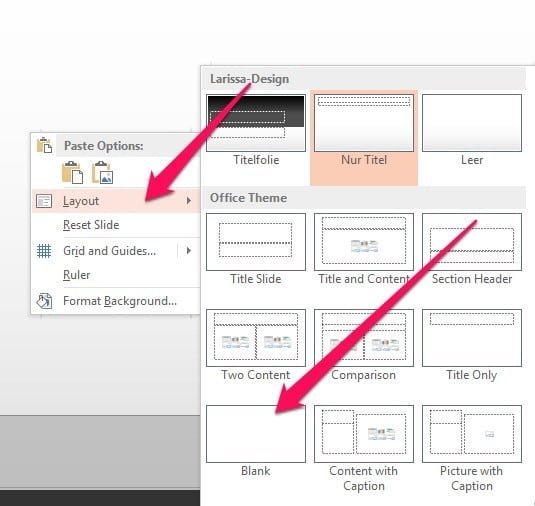
- Create a new slide.
- Right click anywhere on the slide, choose Layout and then Blank.
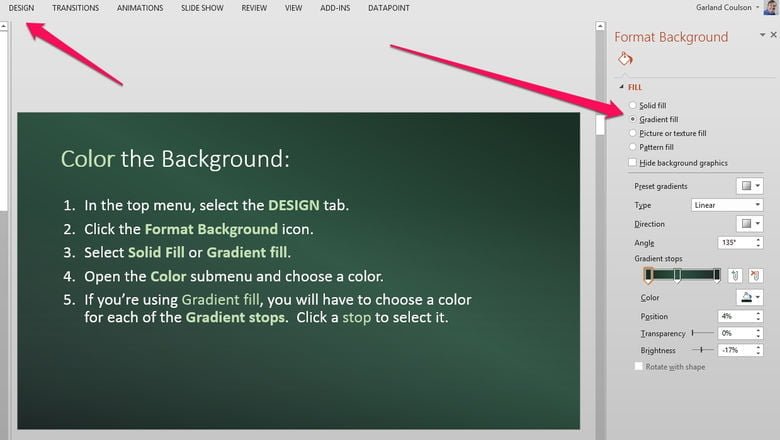
Change the Background
- In the top menu, select the Design tab.
- Click the Format Background icon.
- Select Solid Fill or Gradient fill.
- Open the Color sub menu and choose a color.
- If the user is using Gradient fill, the user will have to choose a color for each of the Gradient stops. Click stop to select it.
Add Digital Menu Boxes
Turn on the grid; hold Shift, press F9. Snap objects to grid:
- From top menu, click on View, then in the Show group, click on the small object at the right side of the box.
- Put a check beside Snap objects to grid.
- Click OK.
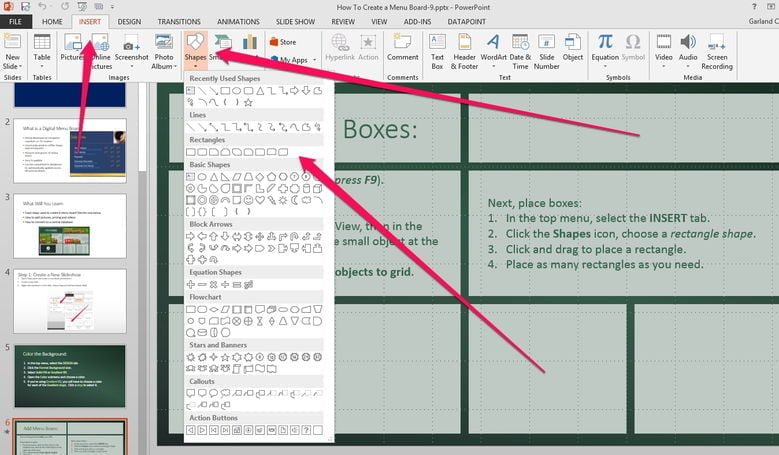
Next, place boxes for the menu boards on the grid:
- In the top menu, select the Insert tab.
- Click the Shapes icon, choose a rectangle shape.
- Click and drag to place a rectangle.
- Place as many rectangles as needed.
Colour the Digital Menu Boxes
Once the user has the placeholder shapes for the menu boxes, set the background colours for each of the shapes that the user was created. How to change rectangle colors:
- Right click a rectangle, click Format.
- A menu will come up on the right with options.
- Choose the colour that the user wants.
How to make a rectangle transparent:
- Right click a rectangle then click Format Shape.
- In the right menu, look under the Shape Options tab, drag the Transparency slider to 100%.
.

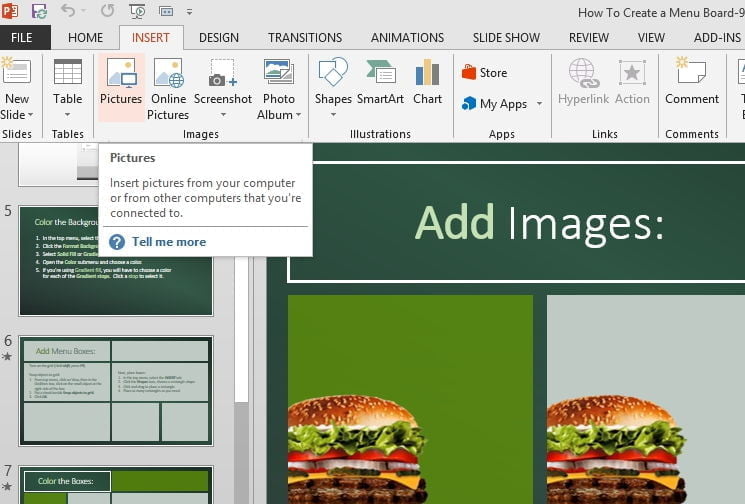
How to Add Images to Digital Menu Boards
How to insert an image:
- In the top menu, select the Insert tab, click the Pictures icon.
- Find picture, click Insert.
How to copy an image: While holding CTRL, click and drag the image. If the user wants to update images and other data in multiple locations, see the menu boards data connection instructions further down.
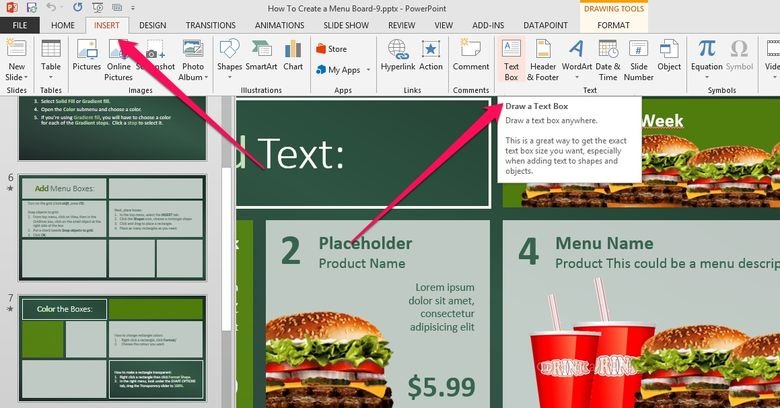
Adding Text to Digital Menu Boards
How to add a text box:
- In the top menu, select the Insert tab.
- Click the Text Box icon.
- Click and drag to place a text box.
- Place as many text boxes as needed.
How to change text size and color:
- Select the text, right click on the selection.
- Use the Font Size and Font Color icons.
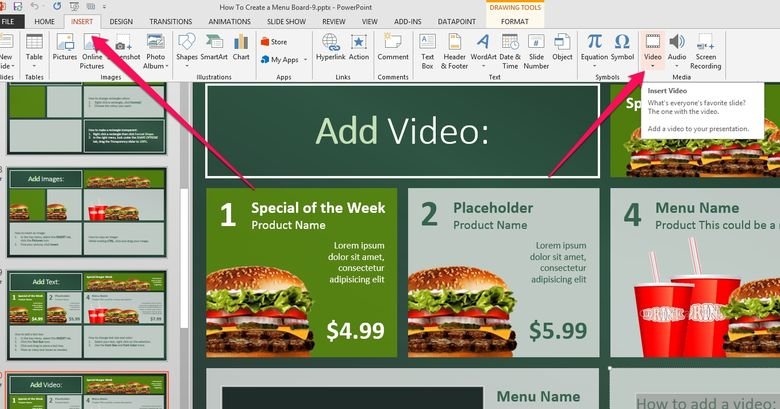
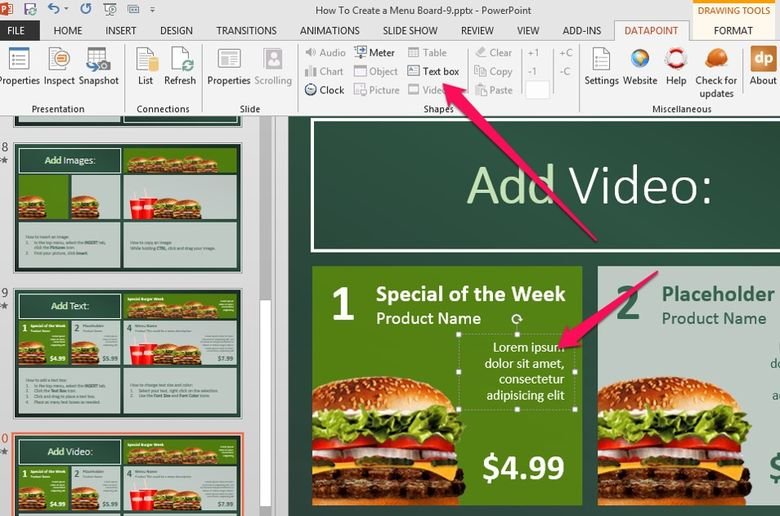
How to Add Video to Digital Menu Boards
How to add a video:
- In the top menu, select the Insert tab.
- Click the Video icon. Choose Online Video or Video on My PC.
- Hold click the video and drag it to where the user like to place it.
Connecting to a Data Source
Connecting to a data source lets the user edit a data file to change all the menu items to all the locations via the Internet. The user will need the DataPoint™ PowerPoint plugin to connect the menu board to a database. The user can download this plugin at www.PresentationPoint.com. Another useful plugin for multiple locations is the digital signage player software, iPoint™ – also from PresentationPoint.
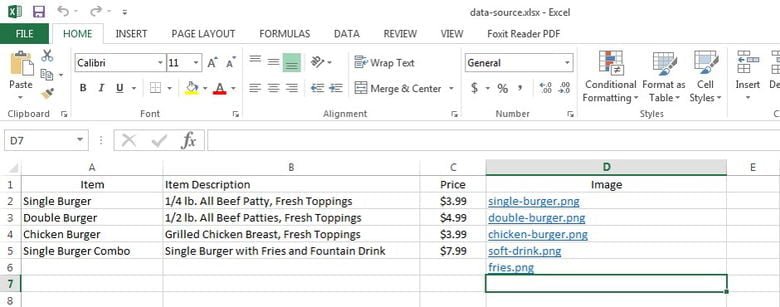
Create a Data Source
Create the data source. The user data source can be held in:
- Excel Spreadsheet
- Microsoft Access database
- XML file
- RSS feed
- Oracle
- MySQL
- and many more
Here is an example of a data source we created for our digital menu – an Excel spreadsheet.
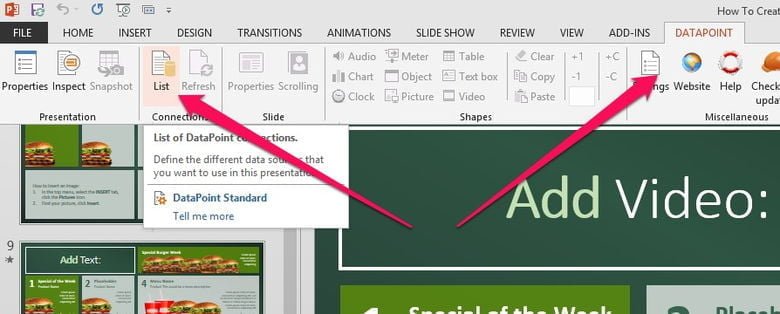
To Add a Data Connection
Click on DataPoint, then List icon.
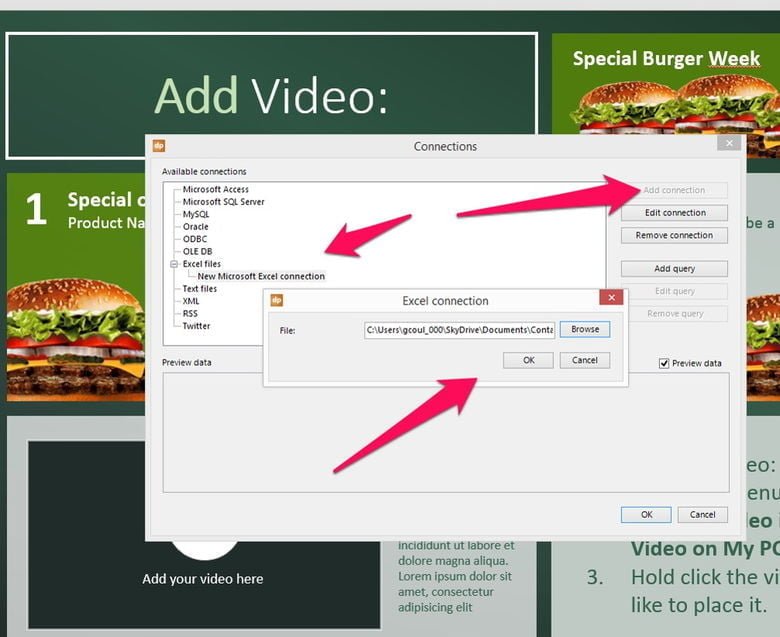
Next Add Connection
- Choose the type of connection; Excel in this case.
- Click on Add Connection.
- Browse to the data file the user created and click OK.
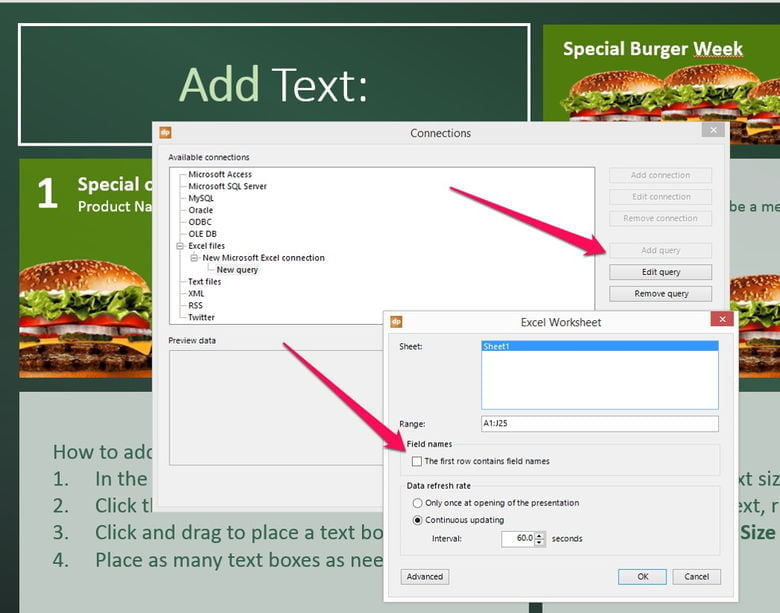
Then Add Query
- Click on Add Query – now it will show the data within the spreadsheet.
- Tick the box if The first row contains field names.
- Set how often the user wants the data to refresh on the menu board.
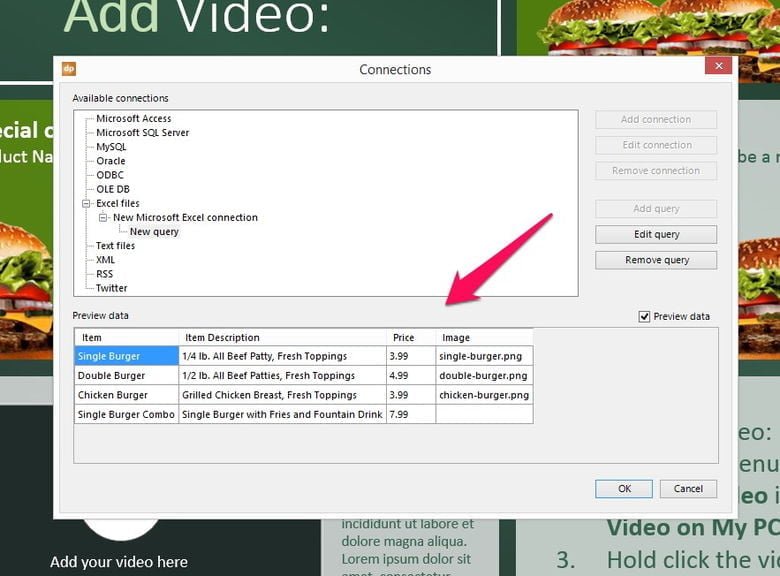
Review Data Preview
The data from the spreadsheet should show now. Click OK.
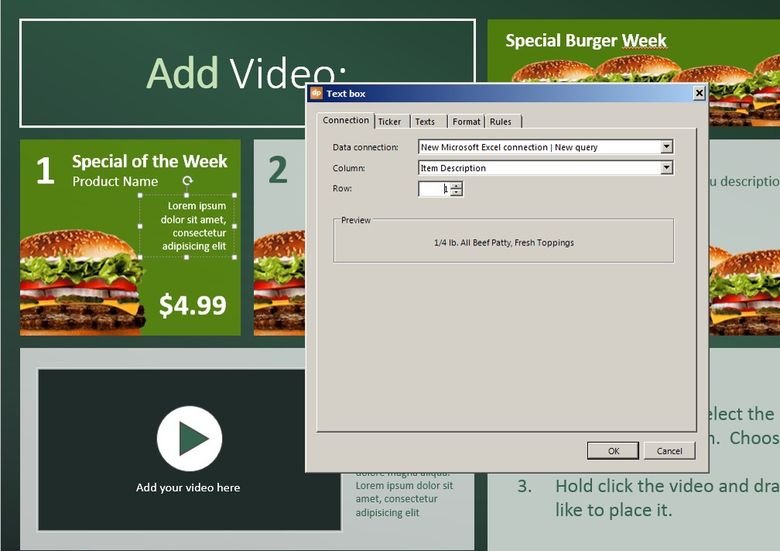
Connecting a Text Box to Data
- Click on the text box to connect.
- Click on DataPoint, then Text Box.
Choose Data For Text Box
- Choose the Column and Row.
- Preview will show what will be added.
- Click OK.
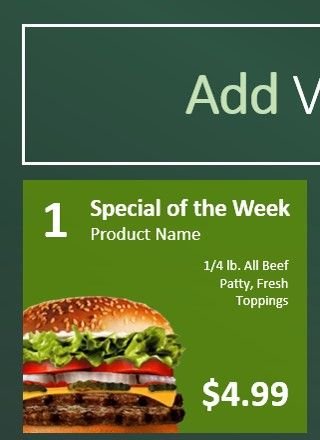
Connect Menu Board Images to Data Source
The user can connect images for the digital menu boards to the data source, the same way as the connected the text box. Once done, the user has digital menu boards that the user can update from a central location just by updating the spreadsheet or other data source.
Our PowerPoint Plugins and Clients
Our PowerPoint plugins are used for menu boards, digital signage and many other uses by companies like these.


How will I be able to put the menu on my tv screen in my store after I have completed the it
Hi Yaser,
You need a computer, a small computing device and some utilities.
There are some articles like;
https://presentationpoint.com/blog/optimize-powerpoint-for-information-screens/
https://presentationpoint.com/blog/start-information-board/
https://presentationpoint.com/blog/small-device-big-digital-signage-screens/
Do you have a tutorial for Mac users?
Sorry Joseph, but our software runs on Windows PowerPoint only. Mac not (yet) supported.
hi. does my computer need to be on all day for this to transmit to the tv.
or can i store it on a usb and play on repeat
Good question Vince,
If you want to use add-ons for PowerPoint to update your pricing etc in real-time, or show news and weather information on your menu board, then you need a computer to be connected to your television via the VGA or HDMI port.
But when that is not required, then you could export your presentation in PowerPoint, as images (jpg or png) or as videos (wmv or mp4). That export can be placed on your USB stick for playback without a computer. An export to images will most likely not be a problem for your television. For videos, you have to check the playback specifications of your TV. There is a good chance that wmv video is not supported and that mp4 is supported, but maybe restricted to a maximum pixel dimension, or another specific codec setting.
Which TV should I purchase to assure that I will be able to display my menu board?
I guess that whatever TV you can buy nowadays, will work. For the technical requirements, just check that the TV has a VGA or HDMI port on this.
With that, you can connect any PC to your television.
Hello and thank you, how can I rotate images, like different menus on the same TV. Just a slideshow on Powerpoint?
And also I need a video running while the menus change, is that possible?
Thank you
You could easily use several slides after each other in your presentation. One slide per image or menu.
Or you can use our dynamic pictures add-on to use some kind of picture slider on one page. https://presentationpoint.com/software/dynamicelements/pictures/
Same for video is possible. You could insert a movie on each slide as well.
Hope this helps you further! It is very easy to use PowerPoint for this DIY menu board. Even very professional looking. Check out our samples at the premium templates (https://presentationpoint.com/templates/professional-digital-signage-templates/)
Thank you for your fast and kind response, I have another one. Can it be the same video running without interruption during the presentation of the slides?
Good question. Yes, we have a special add-on that allows you to run a video ‘continuously on top’ of your powerpoint slideshow.
I can send you a test version if you want.
Hi I live in Kamloops BC and just wanted to know the price for the TV signs and if you guys install them in Kamloops BC
Thank you
Kal
Sorry Kal, but we do the software only. It is best and easy to get your hardware locally. Have a look at this nice computer stick:
https://presentationpoint.com/blog/small-device-big-digital-signage-screens/
And this article:
https://presentationpoint.com/services/what-is-digital-signage/
And for our software (not sure what exactly that you want to show):
https://presentationpoint.com/blog/create-digital-signage-playlists-powerpoint/
Let me know if you have further questions!
I want to create a customer management notice board that can be updated by several different users as the customer passes through the business from reception to waiting areas etc. What is the best way to achieve this?
Hi Jerry,
Do you have a specific database technology in mind? Are you a bit technical or do you have tech people in your company?
Do you want to guide people thru the building like e.g. at a hospital?
what about doing a 4 screen menu board, using 1 picture/slide along all 4 then single slides on each screen/
Hi Darren,
Sure, that is possible with our software and a special graphics video card.
See more at there articles: https://presentationpoint.com/blog/multiscreen-digital-menu-boards/ and https://presentationpoint.com/blog/powerpoint-multiple-monitor-systems/
This blog is fascinating one and it induce me to know more about it. Thanks for the sharing this blog and keep on sharing these kind of useful blogs.
Will this work if i just save it to a usb stick to display on a tv without a internet connection. Also how do you lock your text and images into the individual menu boxes.
When you export it as video (you can do in ppt), then you could use it on a memory stick or USB stick indeed. But if you want have it in PowerPoint format directly, with maybe a clock, weather and news for example, then you might need a computer. We often recommend the intel compute stick. Cheap and perfect for this job. https://presentationpoint.com/blog/digital-signage-player-using-computer/
I am also into the Digital Signage Industry and this presentation is something which will be very helpful to me.
Thank you so much for sharing
Say I want 3 tvs together to display the menu for a restaurant. Do we need 3 different compute sticks for each tv? If they will be side by side?
Then you have 2 options; a) indeed 3 intel compute sticks or b) you use one larger computer with a video graphics card in it to support your 3 monitors from one computer. Then use our Dynamic Wall software to display one powerpoint presentation over all 3 screens. https://presentationpoint.com/blog/multiscreen-digital-menu-boards/
Hi, your information is easy to follow. I created one menu and transported the slide into jpeg format. In the tv, the menu shows up only in the centre of the screen.
HOW CAN I EXPAND TO COVER WHOLE TV SCREEN?
Thank you
Maybe the image is too small. Or it could be a setting on your television.
But first I would suggest to export your slide with a higher resolution and try that new image on your tv.
See this article https://presentationpoint.com/blog/convert-powerpoint-to-jpeg/ for a better resolution when you export.
Hello! When you upload your PP video to your TVs, will the Video you added to the PP itself play on loop? Does the whole PP loop in general?
Normally yes. Or that it at least an option on the TV. Like music that you can loop or randomize, you can set your video here too to repeat forever. But that is a setting on your TV.
So I have a PP presentation with 3 slides, all 3 different parts of menu. Page orientation is vertical. I plan to mount the TVs vertically. How do I do this when I put the USB sticks into TVs? Most places say they recommend a commercial TV but I was looking at this one?
Insignia NS-32F201NA23
Thoughts?
Thanks Carolina,
A few remarks. You need to check where the USB port is for easy accessing in case you want to update. If you want to update frequently (e.g. product of the day) then you need to do this often.
With images you can get burn in easy.
Static images are less attractive than slides or videos with animation.
Consumer TVs are not designed to run more that 6-8h a day!
Check with the vendor if you can use this screen vertically. Professional TVs can be rotated and used in video wall mode. Consumer TV mostly not and this is because of the ventilation. You might be sending hot air from one screen directly into the other!
Personally I would advice to use professional TVs because you are