

Default PowerPoint Compression = BAD
There is a bad habit of PowerPoint to compress all images by default! Yes, you read correct. The great presentation tool PowerPoint is adjusting your images by default to a low-quality resolution to save space on your hard drive. That was important, years ago when storage was limited and expensive. But now, when you use PowerPoint presentations on large television screens for your advertising and information screens, you need high-quality or high-resolution images.
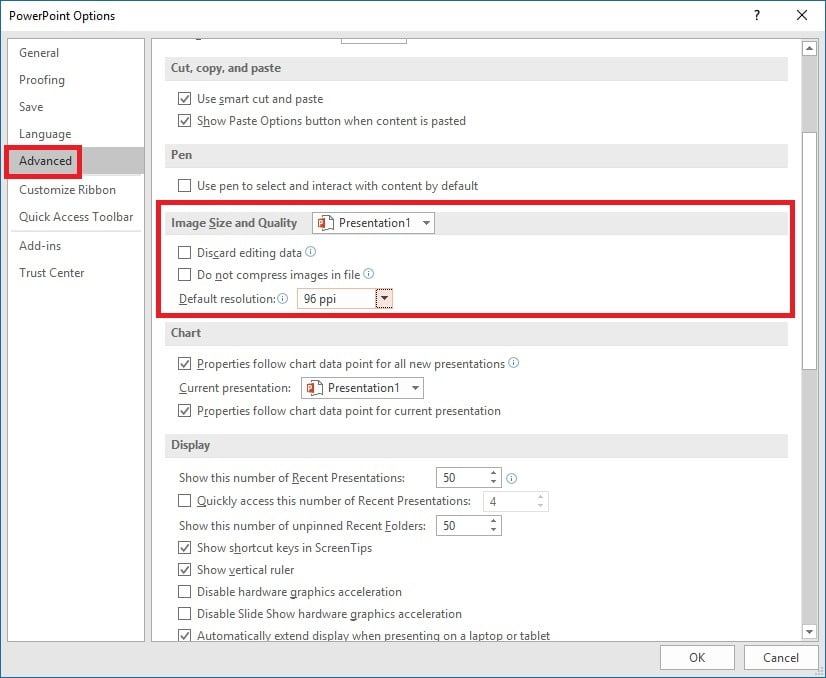
By default, PowerPoint is compressing images with a 96 PPI resolution. PPI stands for Pixels Per Inch, and a value of 96 is low quality. A higher value here would result in a better image quality. There are 2 ways to make sure that you use (and remain to use) high-quality pictures.
Method 1: Per Presentation
The first method is an option that you can change for the current presentation. I can tell you already that the disadvantage of this option, is that you have to apply this setting again for every new presentation, and you will forget that.
To change the default picture compression for the current presentation, click File, Options, Advanced.
So this works fine for this presentation, but you will probably forget to do this change for the next presentations. There is another option to make it change permanently.
Method 2: Permanent higher resolution
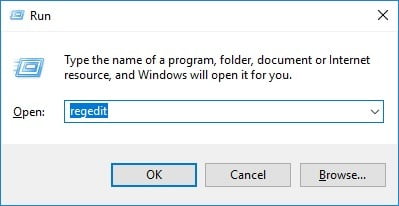
To make this permanent, we have to enter some information into the registry. To fastest way to open the registry editor, is to click the Windows key + R on your keyboard. There you type in the word regedit and hit OK.
Here is another great tip for PowerPoint when you want to export your slides to high-quality JPG images.


I tried both methods neither of them worked
That is weird Ethan. Sure that your base images are high-res before you insert them in PowerPoint?
Don’t want to start a full troubleshooting discussion here. If you want that we look into this for you, please create a trouble ticket via our support link https://presentationpoint.com/support/
Like Ethan above, I tried both methods, and neither worked. also tried restarting my computer with no change to dpi. I made sure that the image I was using was 300 dpi. I need to note that the max resolution my powerpoint program allows is 220.
Scott, same for you. We can look into this if you want, but please create a trouble ticket at https://presentationpoint.com/support
First method worked! Thank you. This issue has been frustrating.
It works! Thanks so much!
First method worked for me, I couldn’t figure out what was going on! thank you.
how do i get this to work for apple Mac i cannot find any of those methods with my version
Hi Naomi. Method 1 will probably work as well on Mac. Method 2 not in this form. Not sure if there is such a thing for Mac.
I found images came in blurry when using cut and paste from Photoshop. If I saved the images as .png then imported them into PPT, they came in sharp. Something about the default file format of cut and paste in windows, PPT doesn’t like.
Interesting. But what is the format of your document when you have it open in Photoshop? Is the PSD? I would expect that you can only copy/paste to PowerPoint when you start from a JPG format file in Photoshop. Makes sense, not? This is of course only an assumption. Try another program. Try to paste your clipboard into a fresh new MS Paint document. Does that work the same as in PowerPoint?
Does not work. Been trying this for months with new and old ppt files. MS 365 Powerpoint. High fidelity with do not compress leads to a drop from 4k+ file size to 157 KB file size of the SAME picture without having done a thing.
Can you please export your registry settings to a file and create a trouble ticket at https://presentationpoint.com/support/
Not our software but willing to look if we can assist you with this.
It worked. Thank you
I can do permanent change with office 2010, but on my new laptop I have Office 365. There, following the instructions of ‘Method 2’, in registry there is no further than HKEY_CURRENT_USER\Software\Microsoft\Office\: here there is only this: 11.0, Common, Outlook. But there is no PowerPoint subfolder in any of them. ‘Method 1’ doesn’t give me the resolution I would like to have. Can you advise please?
Weird because I have Office 365 too and I find everything at Computer\HKEY_CURRENT_USER\Software\Microsoft\Office\16.0\PowerPoint
Scan your full registry for the word ‘PresenterView’. Do you find such a thing related to PowerPoint?
I find this only works for new ppt files. I edited the registry and new ppts have the default to not compress files, but if I open any existing files, they are still set to compress down. Any way to have this setting apply to everything?
Jennifer, yes that is right. PowerPoint compresses the images at the moment that you save the presentation and only for one reason; to save space on your hard drive.
So when you open old (so already compressed) presentations, then you cannot bring back the images to high resolutions. That is definitely gone by the earlier save command.
So your remark is completely true. Thanks for pointing that out.
Tried both methods, neither worked….
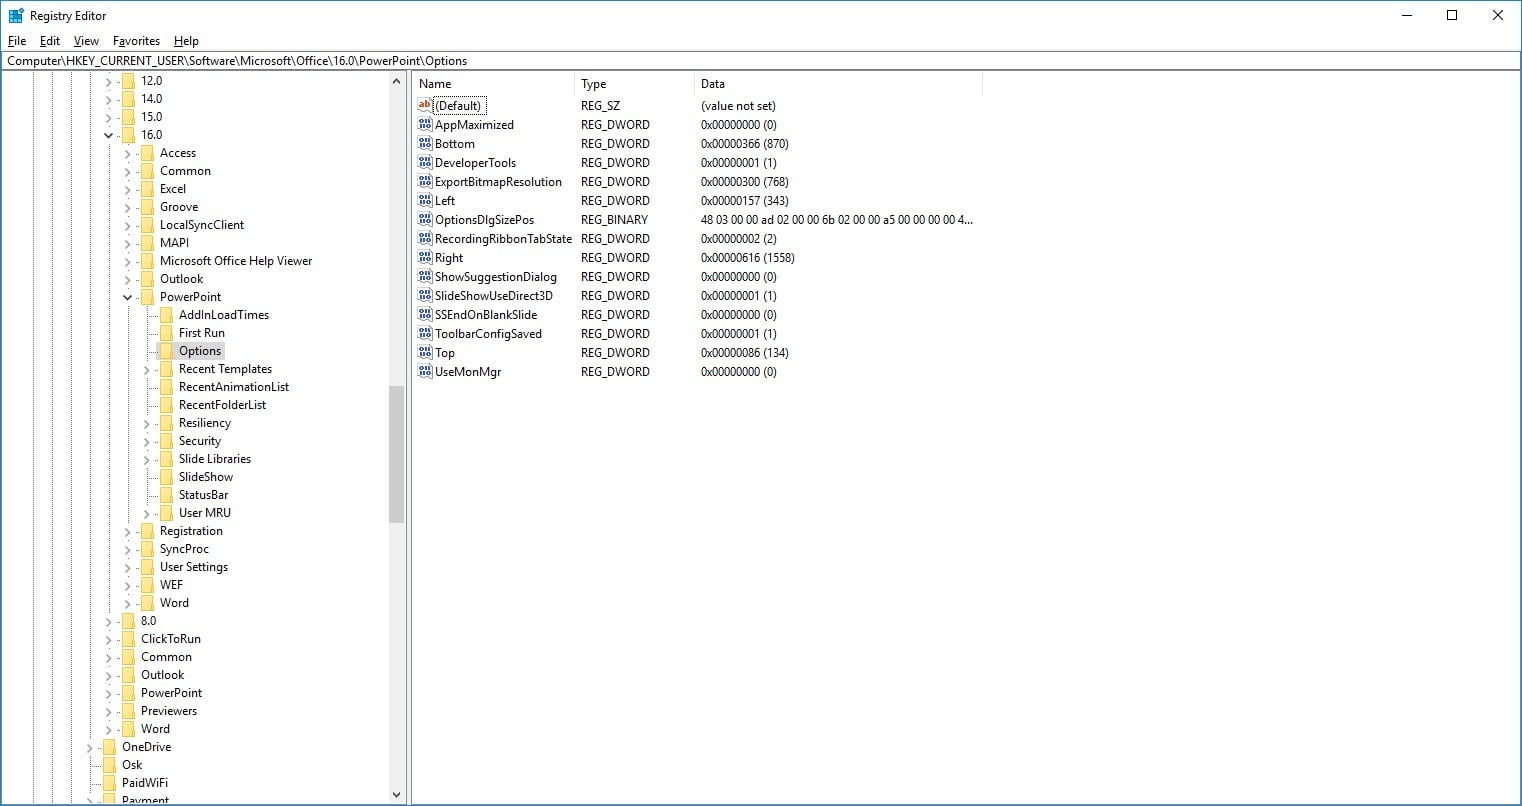
The first method didn’t work, but the second one did. Thank you!!! “The folder 16.0 corresponds to PowerPoint 2016. Use 14.0 for PowerPoint 2010 or 15.0 for PowerPoint 2013” is really important. I first changed the PowerPoint setting under the folder 15.0 without thinking much and it didn’t work. But the 16.0 folder worked.
Thanks for your comments. If 16.0 is working for you then you have PowerPoint 2016 installed. And if you have PowerPoint 2013 then you should use 15.0, you see? So that number is depending on the software version of PowerPoint that you have installed on your computer. So that sounds completely correct.
You can share some screenshots and more details in a trouble ticket so that we can try to help you. You can export your registry settings for example and send it in for a review.
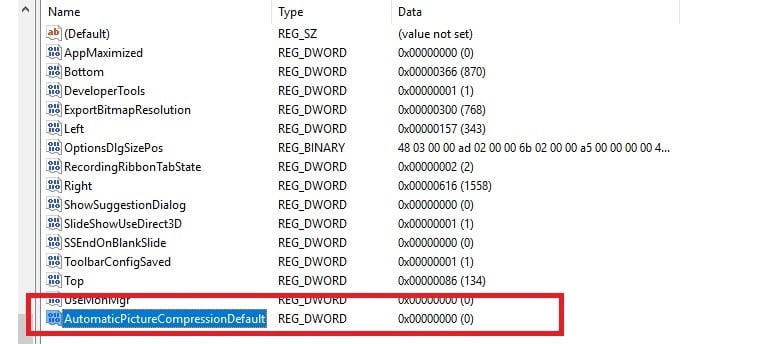
To make the second method works delete the ‘s’ in Pictures from AutomaticPicturesCompressionDefault.
The new Dword should be named AutomaticPictureCompressionDefault.
For Mac users, check instructions on how to change registry
http://www.pptfaq.com/FAQ00862_PowerPoint_2007_and_2010_make_pictures_blurry-_loses_GIF_animation.htm
Good finding Sedrine. Image and text was corrected.
I am really struggling with this issue.I use Powerpoint to create covers that will be printed and interiors for books so the resolution must be 330 DPI at least. I had the option until a recent update of PowerPoint. Now the option 330 ppp doesn’t appear anymore. I have followed a tutorial similar to the one above to change this but it didn’t work. I still only have the 220 ppp maximum as an option to save the images. What can i do? Should i follow the tutorial above again? The one i followed was similar and found on the internet.
Thanks for your help
Can you export your registry settings please and send it in as a trouble ticket our website? Willing to look into this for you.
I am sorry to say it doesn’t work for me either.
I am on PowerPoint 2010, used version number 14.0, spelt the REG_D word correctly and restarted my machine. Now “Do not compress images in file” remains ticked (although the 220ppp option still shows) every time I start up PowerPoint. However, unfortunately when I bring in an image it compresses it. A 3Mb image when inserted as a picture and saved as a jpg will compress to 50K.
Hi Roger, it should be working, but I just learned something new too. After the registry change, you have to try it out with a new presentation. This registry hack has an impact on new presentations only. The setting of compressing images or not, is embedded in the presentation and is thus a presentation setting. That what we do here in the registry, is just a default behavior setting for new presentations when they are created. Can you please test that and confirm?
Hello, i need help with this, cuz i want to make a presentation similar to this, applying this tutorial:
youtu.be/8idIuqvcuW0
But instead of just one continent it is the whole world and I want to zoom to a single country per slide.
The thing is that when I zoom in on the thumbnail, the rest of the map on the previous slide looks pixelated, blurry, how do I solve that?
Hi Gark, no specific experience with this problem. Try to post your question at https://answers.microsoft.com/. There are some real experts watching and replying.
Hi Kurt,
Thank you for your Email. Well I tried it with a brand new presentation. The “Do not compress image in file” was ticked ok,
I set the slides size to A4, imported a 3,861Kb jpg image and then saved it as a jpg. It was saved at 51K. All very annoying because PowerPoint is so versatile, but for my use let down by this one problem.
I’m using a Mac and I don’t have the “options” or “advanced” under file or preferences. How do I fix this on a Mac with PowerPoint 365?
Indeed this is for Windows only. Sorry no way to test on a Mac here.
Hi, ppt 2019 on windows 10 is introducing motion blur though I have compressed it in ppt, set quality to high fidelity and followed https://www.pcreview.co.uk/threads/best-way-of-showing-high-quality-video-in-powerpoint-presentations.3528365/. What shall I do?
Hi Valentin, sorry but no specific experience with this. Maybe someone else here? We do have a plugin to show videos on top of your slideshow independently. Maybe that is an option? https://presentationpoint.com/software/dynamicelements/videos/
Hi. I use Office365 on a Windows PC, is there a similar permanent solution to the “regedit” that can be made please? Thanks.
An alternative to regedit? No that does not exist. But once that you have it, you can export the changes to a single reg file and execute it on another computer. Not sure what your problem is…
Both methods did not work for me. But problems solved via converting ppt to pdf and establishing necessary resolution in GIMP. In my experience quality is fine.
They should be working Kristine, but it is so easy to make mistakes in the registry. If you export your registry to a file, then I can have a look at it. Submit a trouble for this please.
Thanks. I tried the first one and will let you know if it’d keep working fine
It did not work for me either :/
was hoping this would work as i have searched and cant find an answer sadly it hasnt
I start off with a 6mb image when i open it in powerpoint 365 or 2007 and i dont do anything to it just save it as a jpeg or png the resulting save is around 2mb so when the image is opened and enlarged its blurry the original image can be enlarged with no problems…so i cant edit the original image due to the poor quality afterwards …i changed the settings under compress pictures so it says high fidelity it makes no difference the resulting save is terrible also added the line to the registry but i cant stop pp from compressing any file i open
Joe, I would use the 365 PowerPoint version only, definitely not 2007 because it is too old (and its behavior might be different).
First: you are commenting on an article about the automatic compression of pictures in PowerPoint files when you save the PowerPoint pptx file itself. Your problem is about exporting slides to images. Those are 2 different problems or settings.
So first of all, with that high fidelity active, is your pptx around 6mb when you save it? That means that your settings based on this article are working. Right? That is the first step and important to know.
Exporting your slides to images by PowerPoint and the quality of the outcome, is something else. That is explained at our article here: https://presentationpoint.com/blog/convert-powerpoint-to-jpeg/
Both tricks did not help me either.
But….I discover that while exporting an image, you can just select “Save Original Picture”.
That did the trick! 🙂
OK great!!
Can you please indicate the steps for the first method? I don’t know which (file) option you mean? I use mac and when I click on (file), there is no (options) under it!
Sorry we only have PCs to try this on…
I tried method 2 without success. I think this is because we use a custom template for our presentations. I tried to find the template which I managed eventually ( it was here: C:\Users\<>\AppData\Roaming\Microsoft\Templates)
I used Method 1 on the template and it works fine.
Both methods work, needed to be able to zoom in on my pictures to see detail in the presentation. Good shit, cheers mate.
Thanks for the confirmation Tanner! Have a great day.
Hi, thanks for the forum. I have a PC, Powerpoint 2016. I work with 1024 x 1024 pixels, 0.7 x 0.7 cm, and 3716 pixels/inches resolution. Before changing the registry, whatever importation methods these pictures became 165×165 pixels, 5.82×5.82cm with 72 pixels/inch resolution.
After changing the registry as you indicated, the pictures are now 630 x 630 pixels, 22.23 x 22.23 cm with 72 pixels/inch resolution that is far more acceptable for a presentation.
The only thing is that at the importation, the picture size is still “a stamp” size. The wonderful thing is that I do not have to modify my pictures before importing them.
One last thing, this work only on “newly” created files, but not on files that were created before the registry change.
The Devil is always hidden in details
Thank you so much
Thanks Jean-Michel for your feedback! You are right; it only works on new files/slides. You will have to export the slides to jpg again.
Hey good day, the layout of my registry editor is different. The contents in mine are:
(default)
AppMaximized
Bottom
Left
Top
I’ve tried both methods with another laptop, the other laptop had the same layout, it didn’t work.
I’m using Power point 365.
No sure, but we recently published a tool for that where you don’t have to dig into the registry. Check out https://presentationpoint.com/blog/export-powerpoint-slides-to-high-quality-pictures/
Check if that works!
If your machine is managed by an organization’s IT department, you will not be able to this as your user permission levels are restricted. If this is your personal machine, make sure you elevate to admin state if your current sign on does not have admin permissions.